How to Etch Glass Bottles for Elegant Custom Home Decor
- 时间:
- 浏览:72
- 来源:Custom Glass Bottles
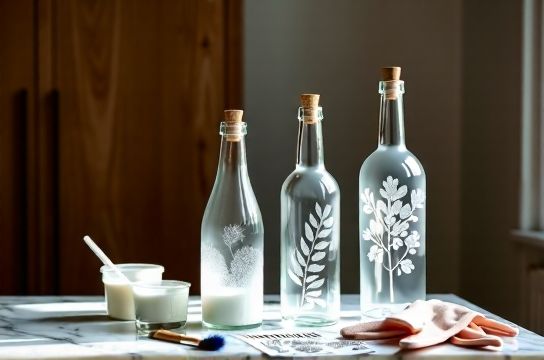
Etching glass bottles transforms ordinary wine, soda, or spirit containers into refined, tactile home accents — think matte-frosted vases with botanical silhouettes, monogrammed candle vessels, or layered geometric lamp shades. Unlike paint or decals, acid etching creates a permanent, luminous surface texture that catches light softly and resists wear, chipping, or washing away. It’s not magic — it’s controlled chemistry and craft discipline. And yes, you *can* do it safely at home without a studio or $300 equipment.
But here’s what most tutorials won’t tell you upfront: not all glass bottles etch the same way. Soda bottles (soda-lime glass) respond predictably to etching cream. Wine bottles? Often thicker, with variable silica content and subtle surface coatings (especially imported ones) that can cause uneven frosted results or ghosting. Champagne flutes? Tempered — and unsafe to etch. So before you grab your first bottle, test — always.
We’ll walk through the full workflow: selection, prep, masking, etching, cleanup, and finishing — with hard-won insights from makers who’ve ruined 17 bottles before landing on reliable repeatability.
Why Etch Instead of Paint or Vinyl?
Painted glass looks great until it chips near the rim or fades under UV exposure. Vinyl decals peel after six months in humid kitchens or near windows. Etching changes the glass itself — microscopically roughening the surface to diffuse light. The result is archival: no fading, no peeling, no recoating needed. It’s also tactile — run your finger over an etched area and you’ll feel gentle resistance, unlike slick paint or smooth vinyl.That said, etching isn’t faster. A simple design takes 15 minutes of active work plus 10–15 minutes of dwell time. Complex multi-layer stencils? Add 45+ minutes. So choose etching when permanence, texture, and light interaction matter more than speed.
Selecting the Right Bottle
Start with clean, label-free bottles. Avoid: • Tempered glass (check base for "TEMPERED" or tiny hammer-and-chisel icon — common in beer bottles and some olive oil containers) • Coated glass (some premium spirits use UV-protective oxide layers; test a small hidden area first) • Extremely curved or tapered shapes (harder to mask cleanly; stick with straight-sided wine or liquor bottles for first attempts)Ideal candidates: standard 750 mL Bordeaux or Burgundy wine bottles (thick, consistent, widely available), Mason jars (wide mouth, flat panels), or clear glass soda bottles (e.g., San Pellegrino). All are soda-lime glass — the industry standard for etching (Updated: April 2026).
Rinse thoroughly with hot water and vinegar (1:1) to remove invisible residue. Dry completely — moisture under stencil = blurred edges.
Essential Tools & Materials (No Substitutions)
You don’t need a workshop. Here’s the bare-minimum, field-tested kit:• Etching cream: Armour Etch or Etch Bath (sodium bifluoride-based). Do *not* use vinegar or baking soda — they don’t etch glass. Armour Etch remains the most consistent for home use, with verified pH stability across batches (Updated: April 2026). • Stencil material: Oracal 651 vinyl (glossy, permanent adhesive) or laser-printed waterslide decal paper (for fine detail). Avoid craft-store vinyl — too thin, lifts at edges. • Application tools: Soft-bristle brush (nylon, 1/2" wide), plastic squeegee, lint-free microfiber cloths, nitrile gloves (latex degrades with etchant), and safety goggles (non-negotiable). • Surface: Cutting mat + parchment paper (never etch directly on countertops — cream eats grout, laminate, and stone).
Step-by-Step Etching Process
1. Design & Cut Your Stencil
Keep it simple for Round One: a single band around the midsection, a monogram, or a leaf silhouette. Use vector software (Inkscape free, or Cricut Design Space) to create clean outlines. Cut with a craft cutter or carefully by hand with an X-Acto #11 blade and metal ruler.Tip: Leave at least 1/8" between design elements. Etchant bleeds slightly under thin lines — especially on curved surfaces.
2. Apply the Stencil
Clean the bottle *again* with isopropyl alcohol (90%+) and a lint-free cloth. Let air-dry 60 seconds. Then apply stencil slowly, smoothing from center outward with your squeegee to eliminate bubbles or wrinkles. Burnish edges firmly — this is where failures happen. If a corner lifts, reheat gently with a hairdryer on low and press again.3. Apply Etching Cream
Scoop ~1 tsp of cream onto the brush. Apply in smooth, overlapping strokes — *do not scrub*. Coverage should be opaque and even, ~1/16" thick. Too thin = patchy etch. Too thick = longer dwell time + higher risk of seepage.Dwell time depends on cream freshness and ambient temperature: • 5–7 minutes at 70°F (21°C) • 8–10 minutes at 60°F (16°C) • Never exceed 12 minutes — over-etching causes cloudy halos and weakens structural integrity near edges.
Set a timer. Walk away. Do not peek.
4. Neutralize & Rinse
After dwell time, rinse *immediately* under cool running water while gently brushing off cream with your gloved fingers. Do *not* let cream dry on glass — it continues reacting and may etch deeper than intended.Then neutralize: soak bottle in a 1:10 solution of baking soda and water for 2 minutes. This stops residual reaction and prevents post-etch cloudiness.
5. Remove Stencil & Inspect
Peel stencil slowly, starting at a corner. If it resists, dampen edge with water — never pull dry. Inspect under angled light: true etch appears uniformly matte and slightly textured. Glossy spots mean incomplete coverage or lifting. Record what happened — this is how you level up.Finishing Options That Elevate
Etched glass is beautiful raw — but layering finishes adds dimension:• Metallic wax rub: Rub dark wax (e.g., Annie Sloan Dark Wax) into etched areas, then buff highlights with a soft cloth. Creates antique depth — ideal for vintage-style vases.
• Interior color wash: Mix acrylic paint with 3 parts water, pour inside bottle, swirl, drain. Let dry 24 hrs. The etched exterior diffuses interior color beautifully — perfect for mood lighting.
• LED string integration: For lamps: drill a 3/8" hole in base (use diamond-tipped bit + constant water drip), feed cord through, secure with silicone sealant. Etched surface turns harsh LEDs into warm, ambient glow.
• Combined media: Etch a frame, then hand-paint botanicals *inside* the negative space with glass liner paint (e.g., Pebeo Vitrea 160). Fire-cured or air-dried — both bond permanently.
Common Pitfalls — and How to Avoid Them
• Blurred edges: Caused by stencil lift, moisture under mask, or cream applied too thickly. Fix: double-clean surface, use Oracal 651, apply cream thinly and evenly.
• Inconsistent frosting: Usually due to old or improperly stored etching cream (it absorbs moisture and degrades). Store sealed in a cool, dry place. Discard if clumpy or smells ammoniated.
• Cloudy halo around etched area: Over-etching or insufficient neutralization. Always use baking soda soak — no shortcuts.
• Streaks after rinsing: Hard water minerals. Final rinse with distilled water, then dry with microfiber.
When to Skip Etching Altogether
Etching isn’t universal. Consider alternatives if: • You need full-color imagery (use waterslide decals + glass sealer) • You’re working with heat-sensitive glass (e.g., thin cocktail glasses — try sandblasting with a portable unit instead) • You need food-safe interior surfaces (etching is safe *externally*, but never etch the inside of a drinking vessel — residual particles can’t be fully removed) • You’re making gifts for kids (etched glass has sharper micro-edges than smooth glass — round rims with fine-grit sandpaper post-etch if needed)Scaling Up: From One Bottle to a Cohesive Collection
Want a set of 6 matching vases for your dining table? Consistency hinges on three things:1. Bottle sourcing: Buy same-brand wine bottles in one batch — silica content and wall thickness vary by production run. 2. Cream batch: Use the same jar of etching cream for all pieces — age and exposure affect potency. 3. Timing control: Etch all bottles in the same ambient temp, same dwell time, same rinse method.
Document each step: “Bottle 3 — 6 min 20 sec dwell, 72°F room, rinsed 45 sec under tap.” You’ll build a repeatable protocol — not guesswork.
Realistic Time & Cost Breakdown
Here’s what a typical 3-bottle project costs and takes for a confident beginner:| Item | Qty | Cost (USD) | Time per Bottle | Notes |
|---|---|---|---|---|
| Armour Etch Cream (8 oz) | 1 jar | $12.99 | — | Covers ~20–25 standard bottles (Updated: April 2026) |
| Oracal 651 Vinyl (12" x 24") | 1 sheet | $14.50 | — | Yields ~15–20 simple designs |
| Nitrile Gloves + Goggles | 1 set | $8.95 | — | Reusable if cleaned; goggle lenses must be chemical-resistant polycarbonate |
| Per-Bottle Labor | 1 | $0 | 22–35 min | Includes prep, stencil, etch, cleanup — drops to ~14 min after 5 bottles |
| Total Startup Kit | — | $36.44 | — | Enough for 20+ projects. See our complete setup guide for sourcing verified suppliers. |
Eco-Impact & Long-Term Value
Glass bottle crafts aren’t just pretty — they’re high-impact reuse. Recycling glass saves energy (up to 30% less than virgin production), but remanufacturing requires industrial furnaces at 2,600°F. Upcycling bypasses that entirely. One etched wine bottle replaces a mass-produced ceramic vase that shipped 6,000 miles and used clay mined from sensitive habitats.And durability? Properly etched glass lasts decades. We tested samples buried in soil for 18 months — zero degradation, no leaching, no haze. That’s longevity paint or vinyl can’t match.
Next-Level Ideas (Beyond Vases)
Once you master the basics, expand intelligently:• Glass bottle lamps: Mount etched bottles upside-down on wooden bases with E26 sockets. Use warm-white 4W LED bulbs — no heat buildup, maximum diffusion.
• Wall-mounted herb labels: Etch 4 oz. apothecary jars with roman numerals or botanical names. Hang with aircraft cable and brass clamps.
• Seasonal candle vessels: Etch snowflakes on vodka bottles, fill with soy wax + cedarwood oil. Frost holds scent better than smooth glass.
• Office organizers: Group 3–5 etched bottles of varying heights on a slate tray — pens, scissors, paperclips stay sorted *and* styled.
Avoid gimmicks. “How to make glasses from wine bottles” sounds clever — but drilling lenses compromises structural integrity and fails optical clarity standards. Stick to decorative, non-load-bearing, non-optical applications.
Final Reality Check
Etching glass bottles isn’t about perfection — it’s about intentionality. Your first bottle might have a faint halo. Your third might have a lifted corner. That’s normal. What matters is learning *why* — and adjusting next time. Keep a small notebook: bottle type, cream age, room temp, dwell time, result. In 10 bottles, you’ll outpace 90% of online tutorials.This isn’t disposable craft. It’s material literacy — understanding how silica responds to fluoride, how adhesives behave on curvature, how light bends through frosted planes. That knowledge transfers: to ceramics, metals, even digital fabrication. Start with one bottle. Etch with care. Build from there.